No edit summary |
No edit summary |
||
| Line 6: | Line 6: | ||
== Google Authentication == | == Google Authentication == | ||
To set up authentication through Google Account in your Turnkey app, | To set up authentication through Google Account in your Turnkey app, go to https://console.developers.google.com. Sign in under your Google account (or sign up if you don't have it). | ||
# Head to '''Credentials''' and press the "'''Create Credentia'''l" button and choose '''OAuth Client ID'''. | |||
Head to '''Credentials''' and press the "'''Create Credentia'''l" button and choose '''OAuth Client ID'''. | # Next, choose '''Web application''' and enter the name, home page URL and Redirect URL of your application. | ||
Next, choose | |||
==== '''Important!''' ==== | ==== '''Important!''' ==== | ||
At the end of the redirect URL, | At the end of the redirect URL, add the "'''sign-in-google'''" - for example, if your home page URL is — ''<nowiki>https://mdriventestone.azurewebsites.net/</nowiki>'', your redirect URL will be — ''https://mdriventestone.azurewebsites.net/signin-google'' | ||
[[File:Google authentication settings.jpg|alt=Setting up Google Authentication|none|thumb|415x415px|Setting up Google Authentication]] | [[File:Google authentication settings.jpg|alt=Setting up Google Authentication|none|thumb|415x415px|Setting up Google Authentication]] | ||
| Line 21: | Line 19: | ||
==== Copy Secrets to the Portal ==== | ==== Copy Secrets to the Portal ==== | ||
Press Create and copy your '''Client ID''' and '''Client Secret''' from the modal window to portal.mdriven.net. | Press "Create" and copy your '''Client ID''' and '''Client Secret''' from the modal window to portal.mdriven.net. | ||
Save the changes and press "'''Send Settings and Restart'''" to add Google Authentication to your Turnkey App. | Save the changes and press "'''Send Settings and Restart'''" to add Google Authentication to your Turnkey App. | ||
== Microsoft Authentication == | == Microsoft Authentication == | ||
To set up authentication through Microsoft Account in your Turnkey app, | To set up authentication through Microsoft Account in your Turnkey app, go to https://portal.azure.com/#blade/Microsoft_AAD_RegisteredApps (App registrations). Sign in under your Microsoft Account and '''click on "New Registration"'''. | ||
# Name your application (Note: This name will be visible for users when they use Microsoft Authentication) and press '''"Create"'''. | |||
Name your application ( | # Select which account types can use your application login. | ||
# Choose "Web" and enter '''Redirect URLs'''. | |||
Select which account types can use your application login. | |||
Choose "Web" and enter '''Redirect URLs'''. | |||
'''!Important.''' You have to enter a full link to your app (e.g. https://mdriventestone.azurewebsites.net/) and add "'''signin-microsoft'''" at the end of the link. | '''!Important.''' You have to enter a full link to your app (e.g. https://mdriventestone.azurewebsites.net/) and add "'''signin-microsoft'''" at the end of the link. | ||
[[File:Registration information of app.jpg|none|thumb|427x427px|Registration Information of the App]] | [[File:Registration information of app.jpg|none|thumb|427x427px|Registration Information of the App]] | ||
| Line 44: | Line 38: | ||
On the pane to the right, enter a description and expiration time, then click "Add". | On the pane to the right, enter a description and expiration time, then click "Add". | ||
Your '''Client Secret''' will be shown as "Value" in the list of secrets and you need to copy it now (to portal.mdriven.net or to somewhere else, because it will be displayed ''only once'').[[File:Microsoft Client Secret.jpg|none|thumb|817x817px|Microsoft Client Secret]]Save the '''Microsoft Portal''' and copy your Application ID and Client Secret to portal.mdriven.net (App ID to '''Microsoft Client Id''' and Client Secret to '''Microsoft Client Secret'''). | Your '''Client Secret''' will be shown as "Value" in the list of secrets and you need to copy it now (to portal.mdriven.net or to somewhere else, because it will be displayed '''''only once''''').[[File:Microsoft Client Secret.jpg|none|thumb|817x817px|Microsoft Client Secret]]Save the '''Microsoft Portal''' and copy your Application ID and Client Secret to portal.mdriven.net (App ID to '''Microsoft Client Id''' and Client Secret to '''Microsoft Client Secret'''). | ||
[[File:MS client id.png|none|thumb|850x850px]] | [[File:MS client id.png|none|thumb|850x850px]] | ||
In the '''MDriven | In the '''MDriven Portal''', save the change and press "'''Send settings and restart'''" to add Microsoft Authentication to your Turnkey App. | ||
Additionally, in the left menu, you can select "Branding and properties" to enter a logo and other information, like the '''Home page URL''' of your application.[[File:Platforms settings.jpg|none|thumb|677x677px|Enter the Home Page URL of Your App]]Extra info: You view an MS account's given App rights at https://microsoft.com/consent | Additionally, in the left menu, you can select "Branding and properties" to enter a logo and other information, like the '''Home page URL''' of your application.[[File:Platforms settings.jpg|none|thumb|677x677px|Enter the Home Page URL of Your App]]Extra info: You view an MS account's given App rights at https://microsoft.com/consent | ||
==== Windows Authentication ==== | ==== Windows Authentication ==== | ||
In intranet environments, you may want to use existing Kerberos | In intranet environments, you may want to use existing Kerberos Windows auth for users of a Turnkey site. | ||
Start by configuring the IIS to use authentication (this means the IIS takes care of this before your application) - you can follow the [[MDrivenServer with Windows authentication|instructions for MDrivenServer]] for this. | Start by configuring the IIS to use authentication (this means the IIS takes care of this before your application) - you can follow the [[MDrivenServer with Windows authentication|instructions for MDrivenServer]] for this. | ||
You must also do some manual changes to the web.config of | You must also do some manual changes to the web.config of Turnkey: [[SingleSignOn]] | ||
== Facebook Authentication == | == Facebook Authentication == | ||
To set up authentication through your Facebook Account in your Turnkey App, | To set up authentication through your Facebook Account in your Turnkey App, go to [https://developers.facebook.com/ https://developers.facebook.com]. Sign in under your Facebook account or register a new one. | ||
# Head to "My apps" and choose "'''Add a new App'''". Name your app and on the next screen, press "'''Set up'''" on the '''Facebook login''' card. | |||
Head to "My apps" and choose "'''Add a new App'''". Name your app and on the next screen, press "'''Set up'''" on the '''Facebook login''' card. | # Next, select '''Web platform''' and enter the '''Site URL''' (URL of your application), press save, and continue but skip other steps. | ||
# Head to Settings -> Basic and enter the App domain (URL of your application), and save the changes | |||
Next, select '''Web platform''' and enter the '''Site URL''' (URL of your application), press save, and continue but skip other steps. | # Also at Client OAuth Settings, add <SITE URL>/signin-facebook as a valid OAuth Redirect URI. | ||
Head to Settings -> Basic and enter the App domain (URL of your application), and save the changes | |||
Also at Client OAuth Settings, add <SITE URL>/signin-facebook as a valid OAuth Redirect URI. | |||
Now copy the App ID and App Secret to portal.mdriven.net. | Now copy the App ID and App Secret to portal.mdriven.net. | ||
[[File:Facebook authentication settings.jpg|alt=Facebook authentication settings|none|thumb|598x598px|Facebook authentication settings]] | [[File:Facebook authentication settings.jpg|alt=Facebook authentication settings|none|thumb|598x598px|Facebook authentication settings]] | ||
Revision as of 06:22, 31 May 2023
Settings in Portal
This article helps you set up the external login services (e.g. Google, Facebook, Microsoft) in the MDriven Turnkey application. After these easy steps, your application will offer your users the option to sign in with their existing social accounts.
Go to portal.mdriven.net and sign in under your existing account. Head to your application (Views -> Show my Turnkey sites) in which you want to add the external login services.
Google Authentication
To set up authentication through Google Account in your Turnkey app, go to https://console.developers.google.com. Sign in under your Google account (or sign up if you don't have it).
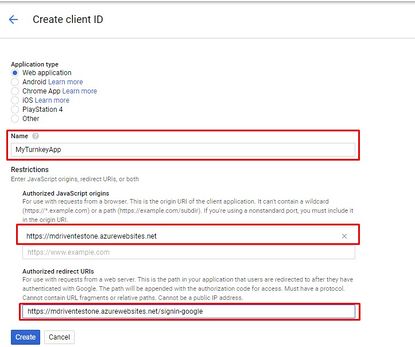
- Head to Credentials and press the "Create Credential" button and choose OAuth Client ID.
- Next, choose Web application and enter the name, home page URL and Redirect URL of your application.
Important!
At the end of the redirect URL, add the "sign-in-google" - for example, if your home page URL is — https://mdriventestone.azurewebsites.net/, your redirect URL will be — https://mdriventestone.azurewebsites.net/signin-google
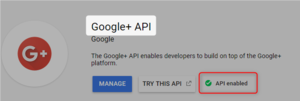
Turn on the Google+ API
Turn on the Google+ API.
Copy Secrets to the Portal
Press "Create" and copy your Client ID and Client Secret from the modal window to portal.mdriven.net.
Save the changes and press "Send Settings and Restart" to add Google Authentication to your Turnkey App.
Microsoft Authentication
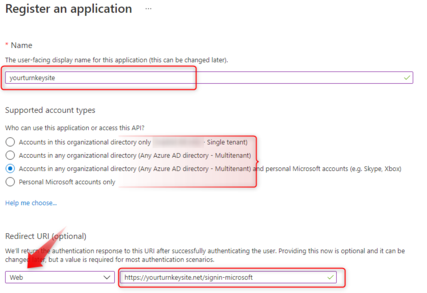
To set up authentication through Microsoft Account in your Turnkey app, go to https://portal.azure.com/#blade/Microsoft_AAD_RegisteredApps (App registrations). Sign in under your Microsoft Account and click on "New Registration".
- Name your application (Note: This name will be visible for users when they use Microsoft Authentication) and press "Create".
- Select which account types can use your application login.
- Choose "Web" and enter Redirect URLs.
!Important. You have to enter a full link to your app (e.g. https://mdriventestone.azurewebsites.net/) and add "signin-microsoft" at the end of the link.
Click "Register"
On the next screen, in the menu to the left, select "Certificates and secrets".
Select "Client secrets" and then "+ New client secret".
On the pane to the right, enter a description and expiration time, then click "Add".
Your Client Secret will be shown as "Value" in the list of secrets and you need to copy it now (to portal.mdriven.net or to somewhere else, because it will be displayed only once).
Save the Microsoft Portal and copy your Application ID and Client Secret to portal.mdriven.net (App ID to Microsoft Client Id and Client Secret to Microsoft Client Secret).
In the MDriven Portal, save the change and press "Send settings and restart" to add Microsoft Authentication to your Turnkey App.
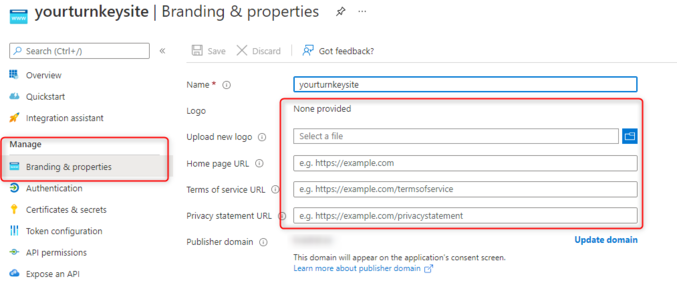
Additionally, in the left menu, you can select "Branding and properties" to enter a logo and other information, like the Home page URL of your application.
Extra info: You view an MS account's given App rights at https://microsoft.com/consent
Windows Authentication
In intranet environments, you may want to use existing Kerberos Windows auth for users of a Turnkey site.
Start by configuring the IIS to use authentication (this means the IIS takes care of this before your application) - you can follow the instructions for MDrivenServer for this.
You must also do some manual changes to the web.config of Turnkey: SingleSignOn
Facebook Authentication
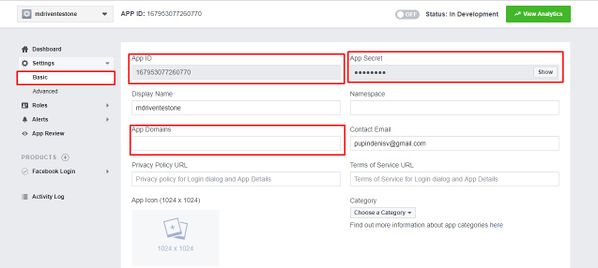
To set up authentication through your Facebook Account in your Turnkey App, go to https://developers.facebook.com. Sign in under your Facebook account or register a new one.
- Head to "My apps" and choose "Add a new App". Name your app and on the next screen, press "Set up" on the Facebook login card.
- Next, select Web platform and enter the Site URL (URL of your application), press save, and continue but skip other steps.
- Head to Settings -> Basic and enter the App domain (URL of your application), and save the changes
- Also at Client OAuth Settings, add <SITE URL>/signin-facebook as a valid OAuth Redirect URI.
Now copy the App ID and App Secret to portal.mdriven.net.
Paste your App ID and App Secret to Facebook Client ID and Facebook Client Secret, save the changes, and press "Send settings and Restart" to add Facebook Authentication to your Turnkey App.


