No edit summary |
Hans Karlsen (talk | contribs) No edit summary |
||
| (33 intermediate revisions by 5 users not shown) | |||
| Line 1: | Line 1: | ||
Reverse engineering is | Reverse engineering is the process of taking a given database and creating a UML model from it. | ||
Videos showing the process of reverse engineering a database to model: [[Documentation:Making sense of legacy data–DB Reverse]] | |||
[[File: | [[File:Reverse database menu option.png|frameless|376x376px]] | ||
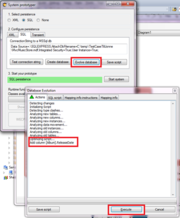
You | You just need to give a valid connection string to it. | ||
In this case, we use the MusicStoreDb from a MicrosoftSample: | |||
[[File:Reod.png|frameless|342x342px]] | |||
[[File:Erase package.png|frameless| | Start by analyzing the database: | ||
[[File:Analyzing_the_database.png|none|frameless|327x327px]] | |||
And then you “Go!”. Be aware that this process will empty the package you started from and fill it with the stuff from the reverse engineer process: | |||
[[File:Erase package.png|frameless|294x294px]] | |||
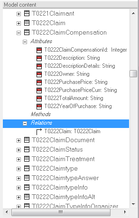
Giving us this in the modlr tree: | Giving us this in the modlr tree: | ||
[[File:Package list.png|frameless]] | [[File:Package list.png|frameless|146x146px]] | ||
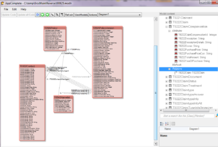
I will drag these classes out on a diagram to get this: | |||
[[File:Diagram_reod.png|none|frameless|218x218px]] | |||
That is enough information to run the model against the same database as we reversed it from: | |||
[[File:Run the model.png|none|frameless|218x218px]] | |||
Giving us a way to use the trusty AutoForms and EcoSpaceDebugger to look at the changeable data: | |||
[[File:EcoSpacedebugger.png|none|frameless|218x218px]] | |||
In this particular database, the RecordId, ArtistId, and so forth are of type int in the database and are designed with “Is Identity==true” in SqlExpress. Also the “Identity Increment” is set in SqlExpress. | |||
The Reverse algorithm gave us a model with int Attributes for the ID – we want ECO to be able to use that Key scheme instead of the standard ECO_ID: | |||
[[File:Use that Key scheme instead of the standard ECO ID.png|none|frameless|218x218px]]The PrimaryKey setting we got from the reversing process and the PrimaryKeyMapper I set to ”AutoInc” – an Eco-supplied primary key mapper with that name that handles the normal AutoIncrease behaviour of databases. (You can create your own named mappers in ECO for VisualStudio). | |||
For the Attribute, we must also say that it is DbAssigned; that forces ECO to omit setting the primary key on the first save and to read the saved row back from the database to get the actual assigned key (which we need to use as a foreign key in related objects): | |||
[[File:Attribute we must also say that it is DbAssigned; .png|none|frameless|230x230px]] | |||
This is enough to enable you to create new objects from the ecospace debugger and have them inserted in the database (or from code or WECPOF or what have you). If you follow along in this brief and try to save a new Album, you will notice 2 SQLServer exceptions. Both Genre and Artist foreign keys are marked NOT NULL in the DB – handle this by assigning an Artist and a Genre to the new Album with AutoForms drag and drop. | |||
=== Database Evolve === | |||
[[File:Script to the Database.png|left|361x361px|frameless]] | |||
To use the Model Evolve mechanism – which calculates what needs to change in the database by comparing a new and old DB script – we have to allow ECO to write the (current) script to the database. If we do not do this, ECO will not have any “old” script to compare the new script with that ECO derives from your current model. | |||
In ECO for VisualStudio, you can choose to store the script some other way by using the ORMappingProvider components in your EcoSpace – but in MDriven, you do not have any code, so you really must allow us to store it in the database. '''Note:''' this is only if you want to use the Database Evolve mechanism. | |||
To write the Script to the Database, open up the prototyper once more by hitting “Run”: | |||
Once you have done this one-time operation, which is only necessary for reversed databases (since standard eco databases have these from the start), we can do some model changes: | |||
[[File:Release_date.png|frameless|220x220px]] | |||
And “Run” and “Evolve”: | |||
[[File:And “Run” and “Evolve”.png|none|frameless|218x218px]] | |||
Looking in the SQL Script tab in the dialog above, we can see the expected script that ECO will send to the database:<blockquote>BEGIN TRANSACTION;</blockquote><blockquote>/* Add column [Album].ReleaseDate */</blockquote><blockquote>ALTER TABLE [Album] ADD ReleaseDate DATETIME DEFAULT ’19000101′ NOT NULL;</blockquote><blockquote>COMMIT;</blockquote>That wraps up this presentation of the Reverse (engineer) database function in MDriven'''.''' | |||
=== MDriven for Massive Projects === | |||
New products, new regulations, new technology, new clients, new business areas, new employees – in short, everything is challenged by a relentless progressive attitude. The IT department needs to be ''agile'' to avoid becoming the heavy-set ''we-cannot-do-it-that-way'' part of the company that limits and slows evolution down. | |||
Apply MDriven on the example database to see what it can do. | |||
[[File:List.png|left|frameless|218x218px]] | |||
The reversing mechanism runs through the Schema of the database and creates Classes of the Tables, Attributes of Fields, and Associations of primary and foreign key pairs. We can now draw diagrams that help us understand what the information is all about. | |||
[[File:Diagram_appcomplete_.png|frameless|218x218px]] | |||
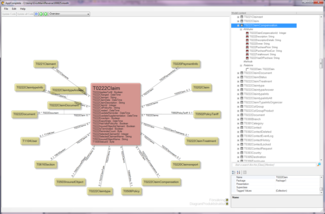
And still have the overview that MDriven’s AutoDiagrams offer: | |||
[[File:Diagram_appcomplete_auto.png|frameless|325x325px]] | |||
Since the information in the database is now explained in a model, I can create ViewModels that run and show the real data with [http://theblog.capableobjects.com/2010/05/wecpof-icing-on-model-driven-cake.html WECPOF as explained here.] | |||
=== Real-life Experiences === | |||
Even if everything is just dandy as far as I can see, when comparing the database schema and Model, I notice that some things are missing. I find some missing associations, classes, and attributes. | |||
Why is that? While the Reverse mechanism of MDriven uses the Schema of the database to conclude about the model – the Schema might not be a complete truth. | |||
After all, developers can always join things in SQL even if those things do not have an explicit primary/foreign key definition. | |||
Developers can use tables that have primary keys according to the Schema etc… In short, the Reverse mechanism is hampered by a crappy input. | |||
=== Defining Persistence Mapping Manually === | |||
I suspect that the “Crappy input” fact is commonplace and MDriven must be able to adapt even in these situations. | |||
Luckily it does; you can add missing classes manually, explaining what the Primary Key is in the properties: | |||
[[File:PrimaryKey.png|frameless|260x260px]] | |||
You can also add Associations this way: | |||
[[File:Add Associations.png|frameless|223x223px]] | |||
It is hard work to look up missing details by browsing the database schema and comparing it with the model. | |||
=== Aided Definition of Persistence Mapping === | |||
The latest versions of MDriven have a way of browsing the database Schema so you do not need to switch tools. Again, right-click the Package, choose Functions, and Reverse Database: | |||
[[File:Red to ECO.png|frameless|273x273px]] | |||
Click Analyze db: | |||
[[File:Analyze.png|frameless|274x274px]] | |||
The schema shows up – if you click “Go!”, the process will start to clear your existing package content and fill it up with the stuff found in the Schema. '''You do not want to do that if you are largely happy with your model''' – just missing some details. | |||
Instead, you can click the new tool “Reverse worker”: | |||
[[File:Reverseworkerhost.png|left|frameless|316x316px]] | |||
This UI shows all the Tables in the DB. Select one Table and see all the columns in that Table. You can use the buttons “Use as PK(primary key) or Attribute” and “Use as FK(foreign key)” to pick columns: | |||
[[File:Reverse worker (2).png|frameless|313x313px]] | |||
If you then move on to step 4 “Find possible actions in the Model”, the tool suggests what you can do with the picked columns: | |||
[[File:Schema (4.5).png|frameless|316x316px]] | |||
In this case, we can add an Association. | |||
Depending on whether the Table is used by any of your Model classes or not, you can also get the option to add the Class: | |||
[[File:Schema (4,5 2).png|frameless|322x322px]] | |||
This tool does the same thing you can do manually as explained earlier in this article – but it saves you the trouble of using some SQL-Browser, copying and pasting SQL-Names, or clicking and editing Persistence mapping attributes of the model. | |||
[[ | === Continued work on your model === | ||
When you are up and running with your reversed model it will probably not take long until you want to add new classes/tables to your database. To fully support standard MDriven models you will need to add a few administrative tables to your database as described here: The [[MDriven administrative database tables]] | |||
[[Category:Database]] | |||
[[Category:Advanced]] | |||
Latest revision as of 11:02, 11 February 2024
Reverse engineering is the process of taking a given database and creating a UML model from it.
Videos showing the process of reverse engineering a database to model: Documentation:Making sense of legacy data–DB Reverse
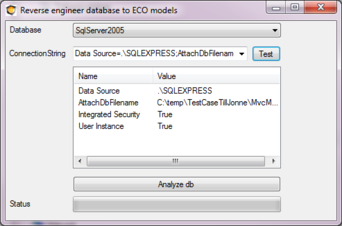
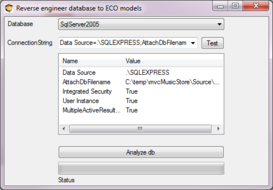
You just need to give a valid connection string to it.
In this case, we use the MusicStoreDb from a MicrosoftSample:
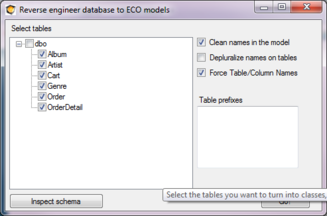
Start by analyzing the database:
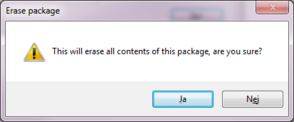
And then you “Go!”. Be aware that this process will empty the package you started from and fill it with the stuff from the reverse engineer process:
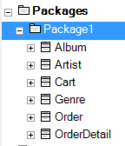
Giving us this in the modlr tree:
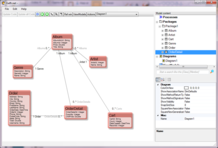
I will drag these classes out on a diagram to get this:
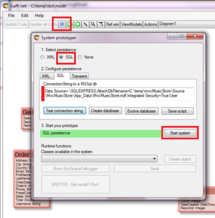
That is enough information to run the model against the same database as we reversed it from:
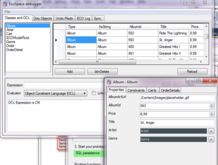
Giving us a way to use the trusty AutoForms and EcoSpaceDebugger to look at the changeable data:
In this particular database, the RecordId, ArtistId, and so forth are of type int in the database and are designed with “Is Identity==true” in SqlExpress. Also the “Identity Increment” is set in SqlExpress.
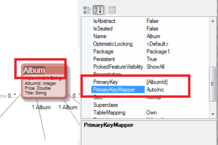
The Reverse algorithm gave us a model with int Attributes for the ID – we want ECO to be able to use that Key scheme instead of the standard ECO_ID:
The PrimaryKey setting we got from the reversing process and the PrimaryKeyMapper I set to ”AutoInc” – an Eco-supplied primary key mapper with that name that handles the normal AutoIncrease behaviour of databases. (You can create your own named mappers in ECO for VisualStudio).
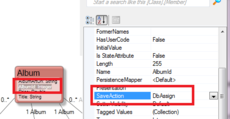
For the Attribute, we must also say that it is DbAssigned; that forces ECO to omit setting the primary key on the first save and to read the saved row back from the database to get the actual assigned key (which we need to use as a foreign key in related objects):
This is enough to enable you to create new objects from the ecospace debugger and have them inserted in the database (or from code or WECPOF or what have you). If you follow along in this brief and try to save a new Album, you will notice 2 SQLServer exceptions. Both Genre and Artist foreign keys are marked NOT NULL in the DB – handle this by assigning an Artist and a Genre to the new Album with AutoForms drag and drop.
Database Evolve
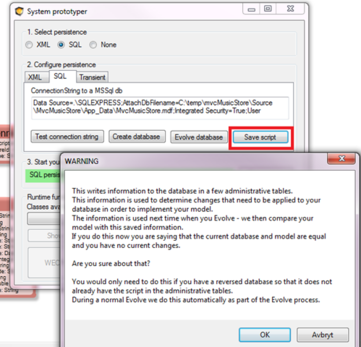
To use the Model Evolve mechanism – which calculates what needs to change in the database by comparing a new and old DB script – we have to allow ECO to write the (current) script to the database. If we do not do this, ECO will not have any “old” script to compare the new script with that ECO derives from your current model.
In ECO for VisualStudio, you can choose to store the script some other way by using the ORMappingProvider components in your EcoSpace – but in MDriven, you do not have any code, so you really must allow us to store it in the database. Note: this is only if you want to use the Database Evolve mechanism.
To write the Script to the Database, open up the prototyper once more by hitting “Run”:
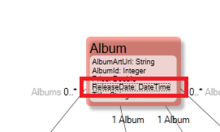
Once you have done this one-time operation, which is only necessary for reversed databases (since standard eco databases have these from the start), we can do some model changes:
And “Run” and “Evolve”:
Looking in the SQL Script tab in the dialog above, we can see the expected script that ECO will send to the database:
BEGIN TRANSACTION;
/* Add column [Album].ReleaseDate */
ALTER TABLE [Album] ADD ReleaseDate DATETIME DEFAULT ’19000101′ NOT NULL;
COMMIT;
That wraps up this presentation of the Reverse (engineer) database function in MDriven.
MDriven for Massive Projects
New products, new regulations, new technology, new clients, new business areas, new employees – in short, everything is challenged by a relentless progressive attitude. The IT department needs to be agile to avoid becoming the heavy-set we-cannot-do-it-that-way part of the company that limits and slows evolution down.
Apply MDriven on the example database to see what it can do.
The reversing mechanism runs through the Schema of the database and creates Classes of the Tables, Attributes of Fields, and Associations of primary and foreign key pairs. We can now draw diagrams that help us understand what the information is all about.
And still have the overview that MDriven’s AutoDiagrams offer:
Since the information in the database is now explained in a model, I can create ViewModels that run and show the real data with WECPOF as explained here.
Real-life Experiences
Even if everything is just dandy as far as I can see, when comparing the database schema and Model, I notice that some things are missing. I find some missing associations, classes, and attributes.
Why is that? While the Reverse mechanism of MDriven uses the Schema of the database to conclude about the model – the Schema might not be a complete truth.
After all, developers can always join things in SQL even if those things do not have an explicit primary/foreign key definition.
Developers can use tables that have primary keys according to the Schema etc… In short, the Reverse mechanism is hampered by a crappy input.
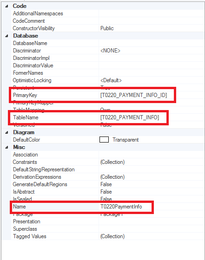
Defining Persistence Mapping Manually
I suspect that the “Crappy input” fact is commonplace and MDriven must be able to adapt even in these situations.
Luckily it does; you can add missing classes manually, explaining what the Primary Key is in the properties:
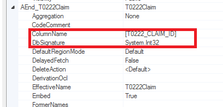
You can also add Associations this way:
It is hard work to look up missing details by browsing the database schema and comparing it with the model.
Aided Definition of Persistence Mapping
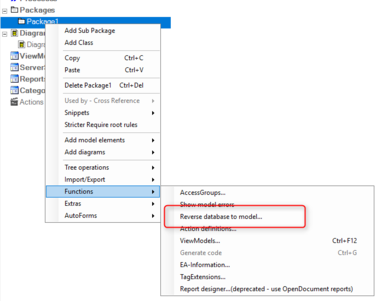
The latest versions of MDriven have a way of browsing the database Schema so you do not need to switch tools. Again, right-click the Package, choose Functions, and Reverse Database:
Click Analyze db:
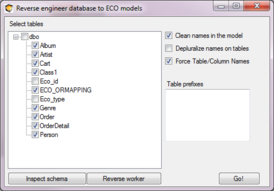
The schema shows up – if you click “Go!”, the process will start to clear your existing package content and fill it up with the stuff found in the Schema. You do not want to do that if you are largely happy with your model – just missing some details.
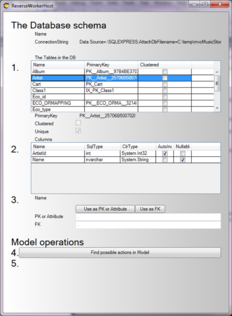
Instead, you can click the new tool “Reverse worker”:
This UI shows all the Tables in the DB. Select one Table and see all the columns in that Table. You can use the buttons “Use as PK(primary key) or Attribute” and “Use as FK(foreign key)” to pick columns:
If you then move on to step 4 “Find possible actions in the Model”, the tool suggests what you can do with the picked columns:
In this case, we can add an Association.
Depending on whether the Table is used by any of your Model classes or not, you can also get the option to add the Class:
This tool does the same thing you can do manually as explained earlier in this article – but it saves you the trouble of using some SQL-Browser, copying and pasting SQL-Names, or clicking and editing Persistence mapping attributes of the model.
Continued work on your model
When you are up and running with your reversed model it will probably not take long until you want to add new classes/tables to your database. To fully support standard MDriven models you will need to add a few administrative tables to your database as described here: The MDriven administrative database tables

