No edit summary |
(Automatically adding template at the end of the page.) |
||
| (4 intermediate revisions by 2 users not shown) | |||
| Line 1: | Line 1: | ||
If you want to debug the CodeDress which executes on MDrivenServer, you can change the model to execute the code on TurnkeyServer for debugging purposes and use the different scenarios described below or install MDrivenServer locally on IIS and use the scenarios below. The Turnkey application uses MDrivenServer, instead. | |||
Set up the IIS and install the Turnkey application. You can use the following articles to get help with the installation of IIS and MDrivenTurnkey locally on your machine: [[Development in Visual Studio]], [[Installing MDriven Server on Windows|Installing MDriven Server on Windows.]] | Set up the IIS and install the Turnkey application. You can use the following articles to get help with the installation of IIS and MDrivenTurnkey locally on your machine: [[Development in Visual Studio]], [[Installing MDriven Server on Windows|Installing MDriven Server on Windows.]] | ||
== Scenario 1: Debug Turnkey CodeDress | == Scenario 1: Debug Turnkey CodeDress With Data From Cloud MDrivenServer == | ||
[[File:Image 1.png|none|frame]] | [[File:Image 1.png|none|frame]] | ||
Set up | Set up your local Turnkey app by copying the template files (green) and renaming them as active(yellow): | ||
[[File:Image 2.png|none|thumb|483x483px]] | [[File:Image 2.png|none|thumb|483x483px]] | ||
In the MDrivenServerOverride.xml point out the MDrivenServer you want to run towards and its password: | In the MDrivenServerOverride.xml, point out the MDrivenServer you want to run towards and its password: | ||
[[File:Debugcoderess image 3.png|none|frame]] | [[File:Debugcoderess image 3.png|none|frame]] | ||
Verify that | Verify that it starts and that it fetches data from the given MDriven Server: | ||
[[File:Debugcoderess image 4.png|none|frame]] | [[File:Debugcoderess image 4.png|none|frame]] | ||
Make sure your [[AppPool user| | Make sure your [[AppPool user|AppPool user has full access]] to the Log catalog and to ModelCodeAssemblies (the easiest way to give full control to everyone on these): | ||
[[File:Debugcoderess image 5.png|none|frame]] | [[File:Debugcoderess image 5.png|none|frame]] | ||
As the Turnkey App started it got the zip containing the model and the CodeDress assemblies (your code) from the MDrivenServer. | As the Turnkey App started, it got the zip containing the model and the CodeDress assemblies (your code) from the MDrivenServer. | ||
This fetch is done | This fetch is done at the start. If you want to restart to fetch to do it again – the best way is to kill the w3wp process and refresh the Turnkey browser: | ||
[[File:Debugcoderess image 6.png|none|frame]] | [[File:Debugcoderess image 6.png|none|frame]] | ||
Maybe the ModelCodeAssemblies have been skipped because the Turnkey found nothing new – you can see this in the log: | |||
[[File:Debugcoderess image 7.png|none|frame]] | [[File:Debugcoderess image 7.png|none|frame]] | ||
To force it | To force it, delete the wwwroot\test88\App_Data\AssetsTKChecksum.xml file, and restart. | ||
When successful CodeDress has been performed you should see something like this in the log: | When successful, CodeDress has been performed and you should see something like this in the log: | ||
[[File:Debugcoderess image 8.png|none|frame]] | [[File:Debugcoderess image 8.png|none|frame]] | ||
Now you are ready to debug | Now you are ready to debug. Start VS and your project holding the model with CodeDress. | ||
Make sure you | Make sure you Codegen, build and then upload the current version of the model (build first to ensure you have the correct assemblies available to upload). | ||
Restart your | Restart your Turnkey app (kill the w3wp process and refresh the browser app page to force it to start). | ||
In VS do Debug/AttachToProcess – Select managed .NET4 code | In VS, do Debug/AttachToProcess – Select managed .NET4 code. Check the Show processes from all users – attach w3wp (the one corresponding to your AppPool): | ||
[[File:Debugcoderess image 9.png|none|frame]] | [[File:Debugcoderess image 9.png|none|frame]] | ||
You must be admin and you will get warned: | You must be admin and you will get warned: | ||
[[File:Debugcoderess image 10.png|none|frame]] | [[File:Debugcoderess image 10.png|none|frame]] | ||
When your web UI calls your model code your breakpoints will be hit: | When your web UI calls your model code, your breakpoints will be hit: | ||
[[File:Debugcoderess image 11.png|none|frame]] | [[File:Debugcoderess image 11.png|none|frame]] | ||
== Scenario 2: Debug Turnkey CodeDress | == Scenario 2: Debug Turnkey CodeDress Without Roundtripping Code Changes to MDrivenServer == | ||
So far | So far so good – but this takes the assemblies on a roundtrip to the MDriven Server and downloads them back into your local Turnkey app. It would be efficient if we could tell Turnkey to fetch CodeDress assemblies from somewhere closer. | ||
To set this up amend the MDrivenServerOverride setting with a CodeDressOverride attribute pointing out where you have fresh CodeDress assemblies: | To set this up, amend the MDrivenServerOverride setting with a CodeDressOverride attribute pointing out where you have fresh CodeDress assemblies: | ||
[[File:Debugcoderess image 12.png|none|frame]] | [[File:Debugcoderess image 12.png|none|frame]] | ||
Ensure to make this location accessible for your AppPool account (just give full access to everyone). | |||
Make code changes, | Make code changes, kill w3wp, refresh the page, and attach w3wp – debug the new code without sending the code to cloud MDriven Server. | ||
== Scenario 3: Debug/Test CodeDress | == Scenario 3: Debug/Test CodeDress Outside of Turnkey == | ||
When you need to focus on a piece of code and loop over it many times you will benefit | When you need to focus on a piece of code and loop over it many times, you will benefit from the smallest possible roundtrip to make it work as you want. For this, the VS edit and continue are fantastic. | ||
You may also want your code access from automated tests – and this can follow the same principle (if your automated test | You may also want your code access from automated tests – and this can follow the same principle (if your automated test needs access to data in an MDriven Server). | ||
For this you need to define an EcoSpace – this is what Turnkey holds internally and is where the objects live in runtime once they are re-animated from persistent storage (from the data in the | For this, you need to define an EcoSpace – this is what Turnkey holds internally and is where the objects live in runtime once they are re-animated from persistent storage (from the data in the DB). | ||
If your system is hybrid and already | If your system is hybrid and already uses WPF or Winforms or anything else that has forced you to create an Ecospace already, then you should probably use that. If not, the easiest way you create it is by the project wizard – new project – EcoProject1.EcoSpaceAndModel. You will get this: | ||
[[File:Debugcoderess image 13.png|none|frame]] | [[File:Debugcoderess image 13.png|none|frame]] | ||
If you have a separate Model project | If you already have a separate Model project, you can delete the ecomdl – and instead reference that project. | ||
The green is called a PersistenceMapperProvider or PMP for short. This is what provides the connection to where the persisted data exists. There are many different ways to access the data | The green is called a PersistenceMapperProvider or PMP for short. This is what provides the connection to where the persisted data exists. There are many different ways to access the data, but we will focus on accessing the data via WebAPI from an MDrivenServer. | ||
We set this up like this in the constructor of the PMP: | We set this up like this in the constructor of the PMP: | ||
[[File:Debugcoderess image 14.png|none|frame]] | [[File:Debugcoderess image 14.png|none|frame]] | ||
The yellow is your target | The yellow is your target MDriven Server, the green is the standard access point. | ||
As this is the only PersistenceMapper-Client we will use we can remove the others provided by the template | As this is the only PersistenceMapper-Client we will use, we can remove the others provided by the template: | ||
[[File:Debugcoderess image 15.png|none|frame]] | [[File:Debugcoderess image 15.png|none|frame]] | ||
We now build our solution (add any missing assemblies – remove SQL assemblies since we will not use). Having built | We now build our solution (add any missing assemblies – remove SQL assemblies since we will not use them). Having built this, the EcoSpace will detect the model-packages found in your code: | ||
[[File:Debugcoderess image 16.png|none|frame]] | [[File:Debugcoderess image 16.png|none|frame]] | ||
What this widget | What this widget does is to add the package reference in code in your EcoSpace: | ||
[[File:Debugcoderess image 17.png|none|frame]] | [[File:Debugcoderess image 17.png|none|frame]] | ||
We now need to create an EcoSpace instance | We now need to create an EcoSpace instance and Activate it to connect it to the MDriven Server. | ||
Use your favorite startable project type – | Use your favorite startable project type – like console app, WPF app, WinForms app, or whatever else you have and do something like this: | ||
[[File:Debugcoderess image 18.png|none|frame]] | [[File:Debugcoderess image 18.png|none|frame]] | ||
[[File:Debugcoderess image 19.png|none|frame]] | [[File:Debugcoderess image 19.png|none|frame]] | ||
You will be able to see saved changes in any other app connected to the same | You will be able to see the saved changes in any other app connected to the same MDriven Server. | ||
You can now take full advantage of VS edit and continue while stepping your code: | |||
[[File:Debugcoderess image 20.png|none|frame]] | [[File:Debugcoderess image 20.png|none|frame]] | ||
[[Category:Debugging]] | [[Category:Debugging]] | ||
[[Category:MDriven Framework]] | [[Category:MDriven Framework]] | ||
{{Edited|July|12|2024}} | |||
Latest revision as of 15:29, 10 February 2024
If you want to debug the CodeDress which executes on MDrivenServer, you can change the model to execute the code on TurnkeyServer for debugging purposes and use the different scenarios described below or install MDrivenServer locally on IIS and use the scenarios below. The Turnkey application uses MDrivenServer, instead.
Set up the IIS and install the Turnkey application. You can use the following articles to get help with the installation of IIS and MDrivenTurnkey locally on your machine: Development in Visual Studio, Installing MDriven Server on Windows.
Scenario 1: Debug Turnkey CodeDress With Data From Cloud MDrivenServer
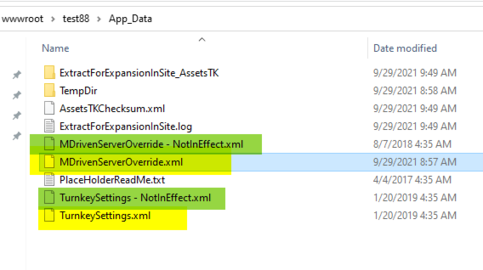
Set up your local Turnkey app by copying the template files (green) and renaming them as active(yellow):
In the MDrivenServerOverride.xml, point out the MDrivenServer you want to run towards and its password:
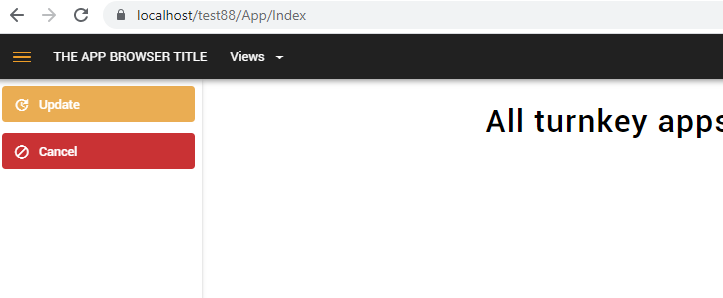
Verify that it starts and that it fetches data from the given MDriven Server:
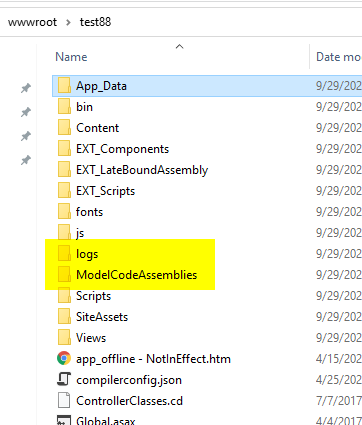
Make sure your AppPool user has full access to the Log catalog and to ModelCodeAssemblies (the easiest way to give full control to everyone on these):
As the Turnkey App started, it got the zip containing the model and the CodeDress assemblies (your code) from the MDrivenServer.
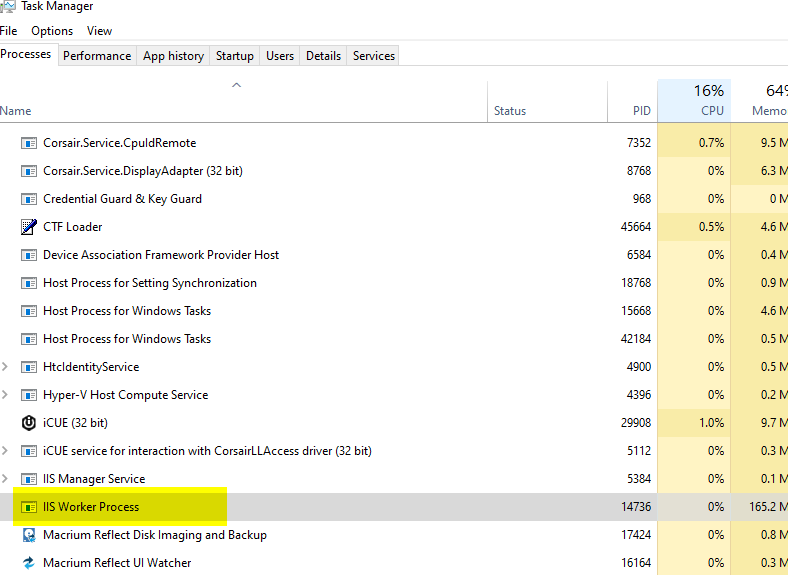
This fetch is done at the start. If you want to restart to fetch to do it again – the best way is to kill the w3wp process and refresh the Turnkey browser:
Maybe the ModelCodeAssemblies have been skipped because the Turnkey found nothing new – you can see this in the log:
To force it, delete the wwwroot\test88\App_Data\AssetsTKChecksum.xml file, and restart.
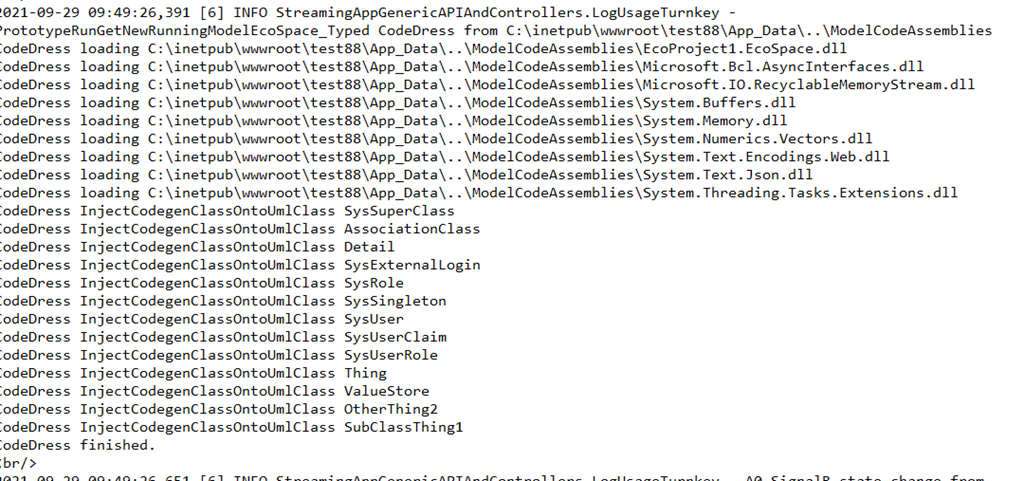
When successful, CodeDress has been performed and you should see something like this in the log:
Now you are ready to debug. Start VS and your project holding the model with CodeDress.
Make sure you Codegen, build and then upload the current version of the model (build first to ensure you have the correct assemblies available to upload).
Restart your Turnkey app (kill the w3wp process and refresh the browser app page to force it to start).
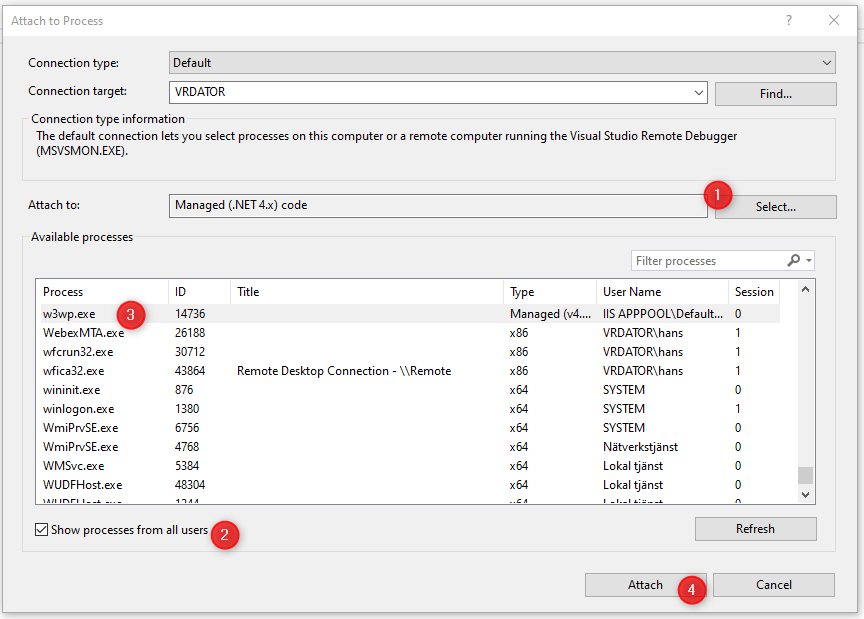
In VS, do Debug/AttachToProcess – Select managed .NET4 code. Check the Show processes from all users – attach w3wp (the one corresponding to your AppPool):
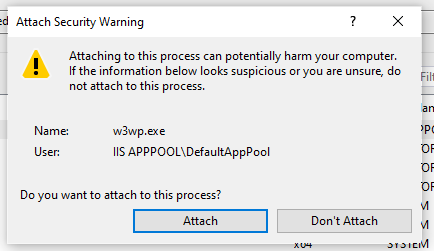
You must be admin and you will get warned:
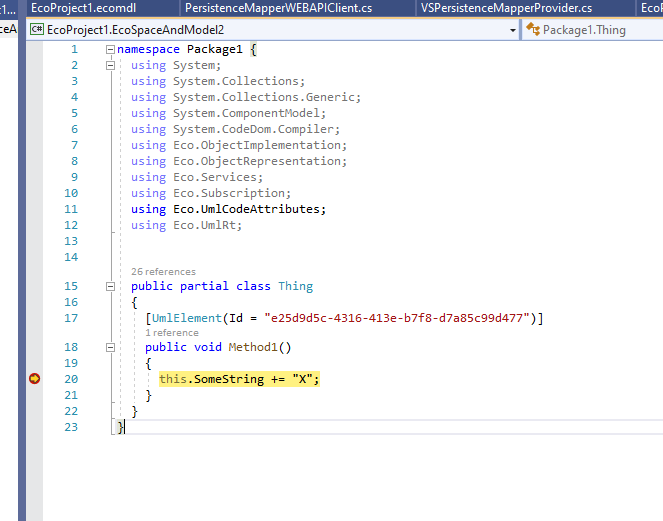
When your web UI calls your model code, your breakpoints will be hit:
Scenario 2: Debug Turnkey CodeDress Without Roundtripping Code Changes to MDrivenServer
So far so good – but this takes the assemblies on a roundtrip to the MDriven Server and downloads them back into your local Turnkey app. It would be efficient if we could tell Turnkey to fetch CodeDress assemblies from somewhere closer.
To set this up, amend the MDrivenServerOverride setting with a CodeDressOverride attribute pointing out where you have fresh CodeDress assemblies:
Ensure to make this location accessible for your AppPool account (just give full access to everyone).
Make code changes, kill w3wp, refresh the page, and attach w3wp – debug the new code without sending the code to cloud MDriven Server.
Scenario 3: Debug/Test CodeDress Outside of Turnkey
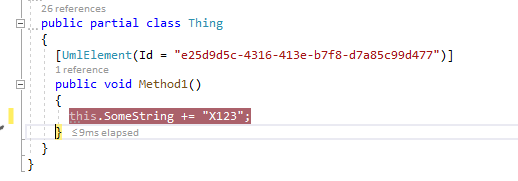
When you need to focus on a piece of code and loop over it many times, you will benefit from the smallest possible roundtrip to make it work as you want. For this, the VS edit and continue are fantastic.
You may also want your code access from automated tests – and this can follow the same principle (if your automated test needs access to data in an MDriven Server).
For this, you need to define an EcoSpace – this is what Turnkey holds internally and is where the objects live in runtime once they are re-animated from persistent storage (from the data in the DB).
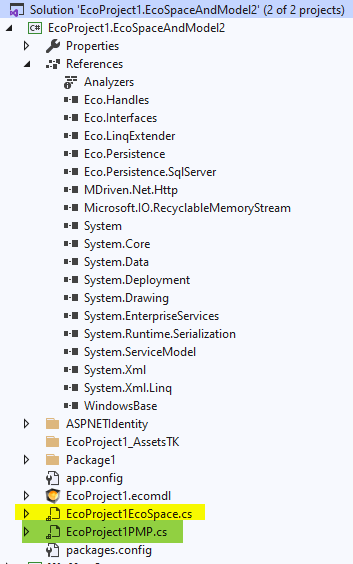
If your system is hybrid and already uses WPF or Winforms or anything else that has forced you to create an Ecospace already, then you should probably use that. If not, the easiest way you create it is by the project wizard – new project – EcoProject1.EcoSpaceAndModel. You will get this:
If you already have a separate Model project, you can delete the ecomdl – and instead reference that project.
The green is called a PersistenceMapperProvider or PMP for short. This is what provides the connection to where the persisted data exists. There are many different ways to access the data, but we will focus on accessing the data via WebAPI from an MDrivenServer.
We set this up like this in the constructor of the PMP:
The yellow is your target MDriven Server, the green is the standard access point.
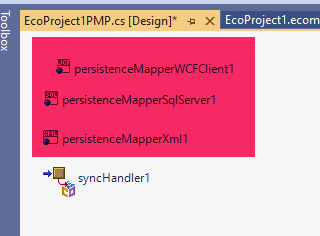
As this is the only PersistenceMapper-Client we will use, we can remove the others provided by the template:
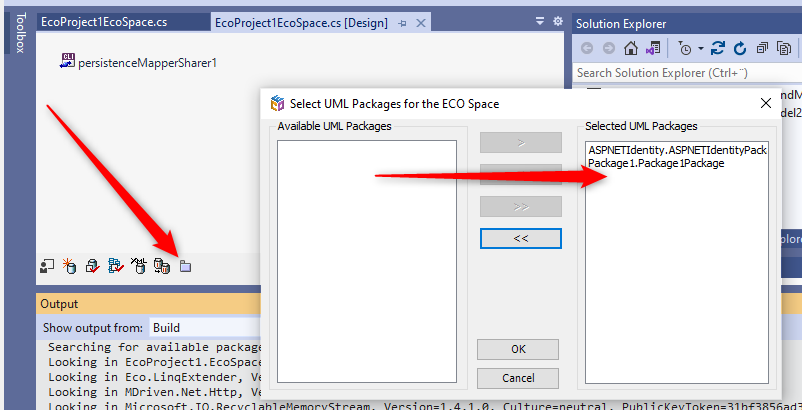
We now build our solution (add any missing assemblies – remove SQL assemblies since we will not use them). Having built this, the EcoSpace will detect the model-packages found in your code:
What this widget does is to add the package reference in code in your EcoSpace:
We now need to create an EcoSpace instance and Activate it to connect it to the MDriven Server.
Use your favorite startable project type – like console app, WPF app, WinForms app, or whatever else you have and do something like this:
You will be able to see the saved changes in any other app connected to the same MDriven Server.
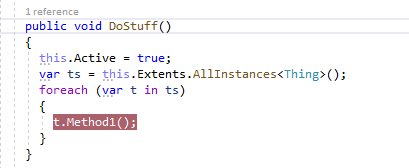
You can now take full advantage of VS edit and continue while stepping your code:


