No edit summary |
(Automatically adding template at the end of the page.) |
||
| (7 intermediate revisions by 3 users not shown) | |||
| Line 1: | Line 1: | ||
You can use WECPOF in design time ECO projects and | <html> | ||
<div class="outdated-alert"> | |||
<p> <span> ❗🕜 Warning: </span> this article may contain outdated information. Consider before using any descriptions/solutions, otherwise, it can still be helpful. <a href="https://wiki.mdriven.net/index.php/MDriven_Product_Line#Synonyms_and_name_changes"> <span> Help: Synonyms and name changes </a> | |||
</p> | |||
</div> | |||
</html> | |||
You can use WECPOF in design time ECO projects and Gaffr.net files. | |||
This article explains how to use it in runtime to deliver finished applications. | This article explains how to use it in runtime to deliver finished applications. | ||
It starts | It starts as an ordinary ECO project (Create one from the wizard, create a new project, Eco project). | ||
Create your model, update the code, configure your Persistence mapper of choice, and set up any remote persistence mapper and synchronization if you want to, just as the PDF tutorials explain. Create or evolve your database, or derive the model from an existing database with the Reverse derive options. | |||
Add a WPF-Window or a WPF-Page (for browser applications). | |||
Make sure your project references WECPOFLogic, then add a reference to the XAML: | |||
xmlns:wecpof="clr-namespace:WECPOFLogic;assembly=WECPOFLogic" | |||
Add a MainMenu and a WECPOFWindowEnvironment (this is where the WECPOF windows will be hosted). | |||
'''Code Snippet''' | '''Code Snippet''' | ||
| Line 41: | Line 46: | ||
</Grid> | </Grid> | ||
</Window> | </Window> | ||
In code behind we need to create our ecospace and hook everything up; this is boiler plate code: | In code-behind, we need to create our ecospace and hook everything up; this is boiler-plate code: | ||
'''Code Snippet''' | '''Code Snippet''' | ||
| Line 83: | Line 88: | ||
} | } | ||
} | } | ||
</pre> | </pre> | ||
| Line 89: | Line 93: | ||
[[File:WECPOF -1.png|frameless|328x328px]] | [[File:WECPOF -1.png|frameless|328x328px]] | ||
[[Category:WECPOF]] | |||
[[Category:Prototyping]] | |||
[[Category:MDriven Designer]] | |||
[[Category:MDriven Framework]] | |||
{{Edited|July|12|2024}} | |||
Latest revision as of 15:49, 10 February 2024
❗🕜 Warning: this article may contain outdated information. Consider before using any descriptions/solutions, otherwise, it can still be helpful. Help: Synonyms and name changes
You can use WECPOF in design time ECO projects and Gaffr.net files.
This article explains how to use it in runtime to deliver finished applications.
It starts as an ordinary ECO project (Create one from the wizard, create a new project, Eco project).
Create your model, update the code, configure your Persistence mapper of choice, and set up any remote persistence mapper and synchronization if you want to, just as the PDF tutorials explain. Create or evolve your database, or derive the model from an existing database with the Reverse derive options.
Add a WPF-Window or a WPF-Page (for browser applications).
Make sure your project references WECPOFLogic, then add a reference to the XAML:
xmlns:wecpof="clr-namespace:WECPOFLogic;assembly=WECPOFLogic"
Add a MainMenu and a WECPOFWindowEnvironment (this is where the WECPOF windows will be hosted).
Code Snippet
<Window x:Class="WpfApplication1.Window1"
  xmlns="http://schemas.microsoft.com/winfx/2006/xaml/presentation"
  xmlns:x="http://schemas.microsoft.com/winfx/2006/xaml"
   xmlns:toolkit="http://schemas.microsoft.com/wpf/2008/toolkit"
  xmlns:wecpof="clr-namespace:WECPOFLogic;assembly=WECPOFLogic"
  Title="Window1" Height="314" Width="354">
 <Window.Resources>
  <LinearGradientBrush x:Key="WECPOFWinBackgroundBrush" EndPoint="0,1" StartPoint="0,0">
    <GradientStop Color="#CCC" Offset="0.0" />
    <GradientStop Color="#EEE" Offset="1.0" />
  </LinearGradientBrush>
... cut for clarity...
  </Window.Resources>

 <Grid>
  <Grid.RowDefinitions>
   <RowDefinition Height="22"></RowDefinition>
   <RowDefinition></RowDefinition>
  </Grid.RowDefinitions>
  <Menu Grid.Row="0"  Name="MainMenu">
  </Menu>
  <wecpof:WECPOFWindowEnvironment x:Name="WecpofWinEnv">
  </wecpof:WECPOFWindowEnvironment>
 </Grid>
</Window>
In code-behind, we need to create our ecospace and hook everything up; this is boiler-plate code:
Code Snippet
public partial class Window1 : Window
{
  EcoSpace _ecospace;
  MenuHandling _MenuHandling;
  public Window1()
  {
    InitializeComponent();

    // Create ecospace or use one that you have
    _ecospace = new EcoProject1.EcoProject1EcoSpace();
    _ecospace.Active = true;
    // Start up the Eco UI dequeuer ; if not set nothing will show
    WPFDequeuer.Active = true;
    // Load viewmodel definitions from embedded resources
    ViewModelDefinitionsInApplication.Init(_ecospace);

    // Create a WECPOF menu handling component
    _MenuHandling = new MenuHandling();

    // Define where WECPOF should look for styles
    WecpofWinEnv.PathToStyles = Directory.GetCurrentDirectory() + "\\Styles";
    // And to where WECPOF should apply a choosen style
    WecpofWinEnv.ResourceDictionaryTargetForStyles(this);
    // Tell the MenuHandling component where to put the MenuItems. Hand over the list of Actions from ECO, hand over the EcoSpace.
    // Send in the WindowEnvironment defined in xaml, and say in what context should the speed keys be evaluated
    _MenuHandling.InitMainMenu(MainMenu, ViewModelDefinitionsInApplication.GetActionsRuntime(), _ecospace, WecpofWinEnv, this);
    // Let the WECPOF Window environment know about the MenuHandling component
    WecpofWinEnv.InstallMenuHandling(_MenuHandling);
    // Implement the event to implement Quit...
    MenuHandling.OnExit += new EventHandler<EventArgs>(MenuHandling_OnExit);
  }

  void MenuHandling_OnExit(object sender, EventArgs e)
  {
    Close();
  }
}
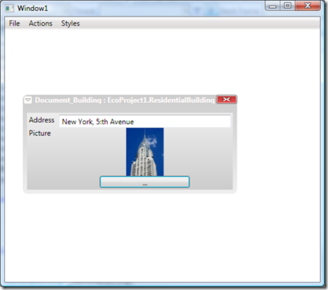
And you are done:

