No edit summary |
No edit summary |
||
| Line 1: | Line 1: | ||
I made a little MVC sample. I deliberately made it | I made a little MVC sample. I deliberately made it small and simple – but ensured it shows the creation, deletion, and updating of attributes and relations. | ||
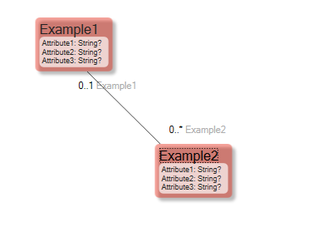
[[File:01 - VM constraints.png|none|thumb|318x318px]] | [[File:01 - VM constraints.png|none|thumb|318x318px]] | ||
| Line 5: | Line 5: | ||
Three ViewModels: | Three ViewModels: | ||
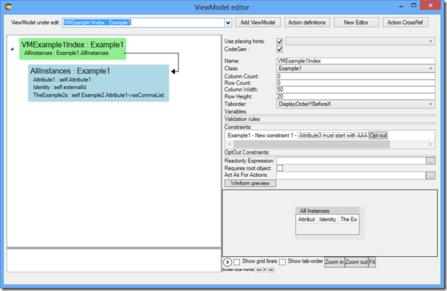
* One to act as index page | * One to act as an index page: | ||
[[File:02 - VM constraints.png|none|thumb|447x447px]] | [[File:02 - VM constraints.png|none|thumb|447x447px]] | ||
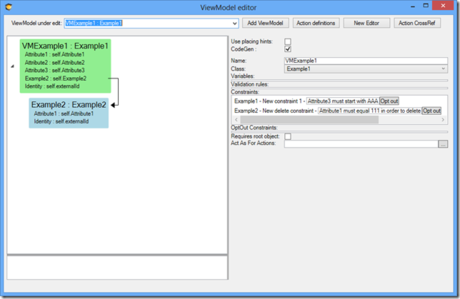
* | * One that shows Example1 and its connected Example2’s: | ||
[[File:03 - VM constraints.png|none|thumb|460x460px]] | [[File:03 - VM constraints.png|none|thumb|460x460px]] | ||
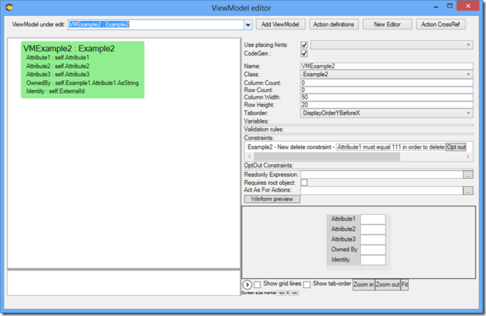
* | * And one that shows a single Example2: | ||
[[File:04 - VM constraints.png|none|thumb|486x486px]] | [[File:04 - VM constraints.png|none|thumb|486x486px]] | ||
Then I made 2 controllers | Then, I made 2 controllers - one for Example1 and one for Example2. | ||
The main goal | The main goal of using the model-defined ViewModels is to use as little code as possible in the Views and in the Controllers. And to also make the code as predictable, simple, and easy to maintain as possible. | ||
The patterns that | The patterns that emerge appear like this: | ||
1. The SHOW STUFF: | 1. The SHOW STUFF: | ||
| Line 32: | Line 32: | ||
Here we resolve an id to an object, then use the ViewModel as a façade on that object and send it to the view. The benefit is that I do not have to expose my whole business object to the view, and I can also do view specific derivations in the | Here we resolve an id to an object, then use the ViewModel as a façade on that object and send it to the view. The benefit is that I do not have to expose my whole business object to the view, and I can also do view specific derivations in the ViewModel. | ||
2. The UPDATE STUFF: | 2. The UPDATE STUFF: | ||
| Line 58: | Line 58: | ||
</html> | </html> | ||
Here we resolve the id to an object, create an online | Here we resolve the id to an object, create an online ViewModel for that object, apply the values from the sent-in offline ViewModel, and commit. The benefits here are mainly that only the things in the ViewModel can change, protecting the rest of your business object. The ViewModel can also be a compilation of details from other parts of your model – and the view need not know anything about this. The ViewModel also has the ability to opt-out of the constraints from the seen classes that do not make sense in this view. This way, class-wide constraints can be used and filtered per view. | ||
3. The DELETE STUFF: | 3. The DELETE STUFF: | ||
| Line 75: | Line 75: | ||
</html> | </html> | ||
Again, look up object from id, call the BusinessDelete that checks our delete constraints, then prepare a | Again, look up the object from the id, call the BusinessDelete that checks our delete constraints, then prepare a ViewModel for where we should end up afterward. The benefits here are that constraints that are put in place to protect the information from ending up in any illegal state are effectively applied even if the update touches several objects. | ||
4. The CREATE STUFF: | 4. The CREATE STUFF: | ||
| Line 93: | Line 93: | ||
Just create the object and commit, skipping the Validate – since I do not know how to react to objects that break their constraints at birth… | Just create the object and commit, skipping the Validate – since I do not know how to react to objects that break their constraints at birth… | ||
The Views use the ViewModels and get code completion since the | The Views use the ViewModels and get code completion since the ViewModels have generated code: | ||
<html> | <html> | ||
| Line 113: | Line 113: | ||
</html> | </html> | ||
Having the bulk of your logic and your rules in the model is a good thing. To help you maintain your model there are | Having the bulk of your logic and your rules in the model is a good thing. To help you maintain your model, there are several new features you may want to use: | ||
1. The CheckModel checks all expressions – ViewModel columns and | 1. The CheckModel checks all expressions – ViewModel columns and constraints and derived attributes and associations: | ||
[[File:05 - VM constraints.png|none|thumb|566x566px]] | [[File:05 - VM constraints.png|none|thumb|566x566px]] | ||
2. There is a new CrossReference menu that works on all things in the model | 2. There is a new CrossReference menu that works on all things in the model - Classes, Attributes, and Associations. You can easily see if an Attribute is in a ViewModel or used by an association etc: | ||
[[File:06 - VM constraints.png|none|thumb|568x568px]] | [[File:06 - VM constraints.png|none|thumb|568x568px]] | ||
Revision as of 06:48, 22 February 2023
I made a little MVC sample. I deliberately made it small and simple – but ensured it shows the creation, deletion, and updating of attributes and relations.
I have added this sample to the Demos in the general download.
Three ViewModels:
- One to act as an index page:
- One that shows Example1 and its connected Example2’s:
- And one that shows a single Example2:
Then, I made 2 controllers - one for Example1 and one for Example2.
The main goal of using the model-defined ViewModels is to use as little code as possible in the Views and in the Controllers. And to also make the code as predictable, simple, and easy to maintain as possible.
The patterns that emerge appear like this:
1. The SHOW STUFF:
        public ActionResult Details(string Identity)
        {
          EcoProject1.Example2 e2 = this.EcoSpace.ExternalIds.ObjectForId(Identity).AsObject as EcoProject1.Example2;
          return View("Details",  VMExample2.Create(this.EcoSpace, e2));
        }
Here we resolve an id to an object, then use the ViewModel as a façade on that object and send it to the view. The benefit is that I do not have to expose my whole business object to the view, and I can also do view specific derivations in the ViewModel.
2. The UPDATE STUFF:
        [HttpPost]
        public ActionResult Details(string Identity, VMExample2 offlinevm)
        {
          Example2 e2 = EcoSpace.ExternalIds.ObjectForId(Identity).AsObject as Example2;
          try
          {
            VMExample2 onlinevm=VMExample2.Create(EcoSpace, e2);
            ViewModelHelper.ApplyValues(offlinevm, onlinevm, null);
            Commit();
            return View("Details", onlinevm);
          }
          catch
          {
            return View("Details", offlinevm);
          }
        }
Here we resolve the id to an object, create an online ViewModel for that object, apply the values from the sent-in offline ViewModel, and commit. The benefits here are mainly that only the things in the ViewModel can change, protecting the rest of your business object. The ViewModel can also be a compilation of details from other parts of your model – and the view need not know anything about this. The ViewModel also has the ability to opt-out of the constraints from the seen classes that do not make sense in this view. This way, class-wide constraints can be used and filtered per view.
3. The DELETE STUFF:
        public ActionResult Delete(string Identity)
        {
          Example1 e1 = this.EcoSpace.ExternalIds.ObjectForId(Identity).AsObject as Example1;
          BusinessDelete(e1);
          Commit();
          return View("Index", VMExample1Index.Create(this.EcoSpace, null));
        }
Again, look up the object from the id, call the BusinessDelete that checks our delete constraints, then prepare a ViewModel for where we should end up afterward. The benefits here are that constraints that are put in place to protect the information from ending up in any illegal state are effectively applied even if the update touches several objects.
4. The CREATE STUFF:
        public ActionResult Create()
        {
          Example1 x1 = new Example1(this.EcoSpace) { Attribute1="HoHoHo",Attribute2="HeHeHe"};
          CommitSkipValidate();
          return View("Index",VMExample1Index.Create(this.EcoSpace, null));
        }
Just create the object and commit, skipping the Validate – since I do not know how to react to objects that break their constraints at birth…
The Views use the ViewModels and get code completion since the ViewModels have generated code:
<table>
@foreach (var item in Model.Example2) {
    <tr>
        <td>
            @Html.DisplayFor(modelItem => item.Attribute1)
        </td>
        <td>
            @Html.ActionLink("Details & Edit", "DetailsForExample2", new {  Identity=item.Identity }) |
            @Html.ActionLink("Delete", "DeleteExample2", new { Identity=item.Identity })
        </td>
    </tr>
}
    </table>
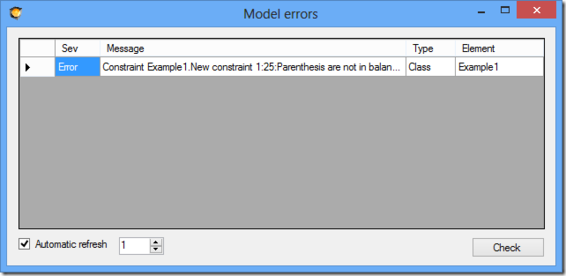
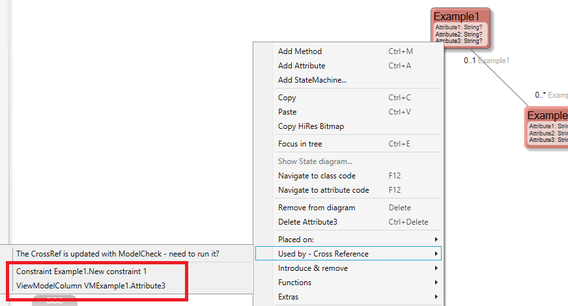
Having the bulk of your logic and your rules in the model is a good thing. To help you maintain your model, there are several new features you may want to use:
1. The CheckModel checks all expressions – ViewModel columns and constraints and derived attributes and associations:
2. There is a new CrossReference menu that works on all things in the model - Classes, Attributes, and Associations. You can easily see if an Attribute is in a ViewModel or used by an association etc:

