No edit summary |
No edit summary |
||
| Line 1: | Line 1: | ||
<html> | <html> | ||
<h4> Boards are really popular and useful. In this video we show how to add one to your MDriven Turnkey application and fill it with any info that is important in your domain model </h4> | <h4> Boards are really popular and useful. In order to do more advanced UI controls in MDriven Turnkey AngularJS you can study how this trello-like-board is constructed. In this video we show how to add one to your MDriven Turnkey application and fill it with any info that is important in your domain model. </h4> | ||
<p class="warn"> | <p class="warn"> | ||
<em>To make your experience more comfortable, we set the main tags mentioned in the video to the right bar menu of this mini player. Choose the interesting subtitle on the list and immediately get to the exact theme timeplace in the video. Now you can pick any topic to be instructed without watching the whole video.</em> | <em>To make your experience more comfortable, we set the main tags mentioned in the video to the right bar menu of this mini player. Choose the interesting subtitle on the list and immediately get to the exact theme timeplace in the video. Now you can pick any topic to be instructed without watching the whole video.</em> | ||
| Line 10: | Line 10: | ||
} | } | ||
</style> | </style> | ||
</p | </p> | ||
<style> | <style> | ||
| Line 78: | Line 78: | ||
</html> | </html> | ||
Installation | ==== Installation ==== | ||
In order to develop something like this it really helps to install [[Installing TurnKey as an Azure WebApp|MDriven Turnkey locally]]. This way you can change and see the effect without ftp’ing a lot of files back and forth. | |||
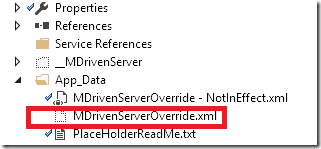
One important ability you may want to use is to continue to use the data in the cloud – but still have the Turnkey web app locally. I use this ability all the time to debug and develop turnkey. And you can use it to when developing page overrides and advanced controls: MDrivenServerOverride.xml | |||
The file MDrivenServerOverride.xml is placed in your App_Data folder and has this format: | |||
[[File:Mdriven Server Override.png|thumb|321x321px]] | |||
<?xml version="1.0" encoding="utf-8"?> | |||
<root> | |||
<MDrivenServerOverride MDrivenServerPWD="----yoursecretpwd---"><nowiki>https://YourMDrivenTurnkeyApp.azurewebsites.net/__MDrivenServer</nowiki></MDrivenServerOverride> | |||
</root> | |||
Adding a file like this allows you to move where MDriven Turnkey should go to find its MDriven Server. Normally the MDriven Server is placed in a sub-application to the Turnkey-application in a folder named __MDrivenServer (double underscores). But this way I can use a local Turnkey app – and point out the MDrivenServer for the cloud app. | |||
== Running the MDriven Turnkey in Visual Studio == | |||
[[File:Web application.png|thumb|376x376px]] | |||
Download and import the MDriven Turnkey in your local IIS – or use IIS Express. Then open the website in Visual Studio. | |||
* Make sure you have the hang of SSL certificate for your localhost or whatever address you will be using. | |||
* Enable SSL on site. | |||
* Add the MDrivenServerOverride file to your App_Data. | |||
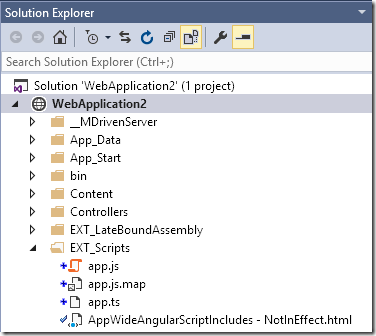
In the WebSite you will find a folder EXT_Scripts. This is where we want to keep our custom scripts. | |||
Also please notice the “AppWideAngularScriptIncludes – NotInEffect.html” file. Whenever you see these “- NotInEffect” files it means that you create a copy of that file and remove the “- NotInEffect” and it will have some meaning. The meaning of file is documented in the file you copied. | |||
This file has this content: | |||
<!-- | |||
This file is referenced like this in the AngularApp.cshtml: | |||
@if (File.Exists(Server.MapPath("/EXT_Scripts/AppWideAngularScriptIncludes.html"))) | |||
{ | |||
@Html.Raw(File.ReadAllText(Server.MapPath("/EXT_Scripts/AppWideAngularScriptIncludes.html"))) | |||
} | |||
----------------- | |||
Intension for this file: To enable you to inject scripts that executes before angular compile - thus making it possible to add directives | |||
Suggested usage in this file: | |||
<script src="/EXT_Scripts/BoardComponentScriptsThatUseDirectivesAndSuch.js"></script> | |||
<script src="/EXT_Scripts/GanttComponentScriptsThatUseDirectivesAndSuch.js"></script> | |||
<script src="/EXT_Scripts/<YourScript>.js"></script> | |||
--> | |||
In this article we are going to add this to the AppWideAngularScriptIncludes file: | |||
[[File:Web application2.png|left|thumb]] | |||
<script src="/EXT_Scripts/Board.js"></script>| | |||
The application will expect to find a Board.js file in EXT_Scripts and we will get to this soon. | |||
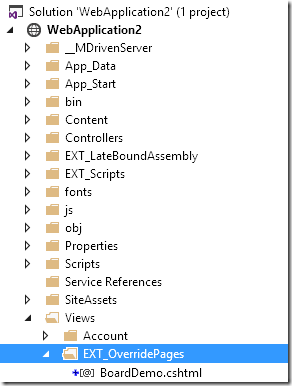
We will also need some markup to replace the Turnkey standard UI. This override markup we put in the EXT_View Folder. | |||
Revision as of 10:06, 5 March 2017
Boards are really popular and useful. In order to do more advanced UI controls in MDriven Turnkey AngularJS you can study how this trello-like-board is constructed. In this video we show how to add one to your MDriven Turnkey application and fill it with any info that is important in your domain model.
To make your experience more comfortable, we set the main tags mentioned in the video to the right bar menu of this mini player. Choose the interesting subtitle on the list and immediately get to the exact theme timeplace in the video. Now you can pick any topic to be instructed without watching the whole video.
- mouse down moves implementation
mouse up moves ( moving a card )
move action in details
Installation
In order to develop something like this it really helps to install MDriven Turnkey locally. This way you can change and see the effect without ftp’ing a lot of files back and forth.
One important ability you may want to use is to continue to use the data in the cloud – but still have the Turnkey web app locally. I use this ability all the time to debug and develop turnkey. And you can use it to when developing page overrides and advanced controls: MDrivenServerOverride.xml
The file MDrivenServerOverride.xml is placed in your App_Data folder and has this format:
<?xml version="1.0" encoding="utf-8"?>
<root>
<MDrivenServerOverride MDrivenServerPWD="----yoursecretpwd---">https://YourMDrivenTurnkeyApp.azurewebsites.net/__MDrivenServer</MDrivenServerOverride>
</root>
Adding a file like this allows you to move where MDriven Turnkey should go to find its MDriven Server. Normally the MDriven Server is placed in a sub-application to the Turnkey-application in a folder named __MDrivenServer (double underscores). But this way I can use a local Turnkey app – and point out the MDrivenServer for the cloud app.
Running the MDriven Turnkey in Visual Studio
Download and import the MDriven Turnkey in your local IIS – or use IIS Express. Then open the website in Visual Studio.
- Make sure you have the hang of SSL certificate for your localhost or whatever address you will be using.
- Enable SSL on site.
- Add the MDrivenServerOverride file to your App_Data.
In the WebSite you will find a folder EXT_Scripts. This is where we want to keep our custom scripts.
Also please notice the “AppWideAngularScriptIncludes – NotInEffect.html” file. Whenever you see these “- NotInEffect” files it means that you create a copy of that file and remove the “- NotInEffect” and it will have some meaning. The meaning of file is documented in the file you copied.
This file has this content: In this article we are going to add this to the AppWideAngularScriptIncludes file:
<script src="/EXT_Scripts/Board.js"></script>|

The application will expect to find a Board.js file in EXT_Scripts and we will get to this soon.
We will also need some markup to replace the Turnkey standard UI. This override markup we put in the EXT_View Folder.


